Google Cloud Platform -GCE VMインスタンス作成-
kapiparaです。
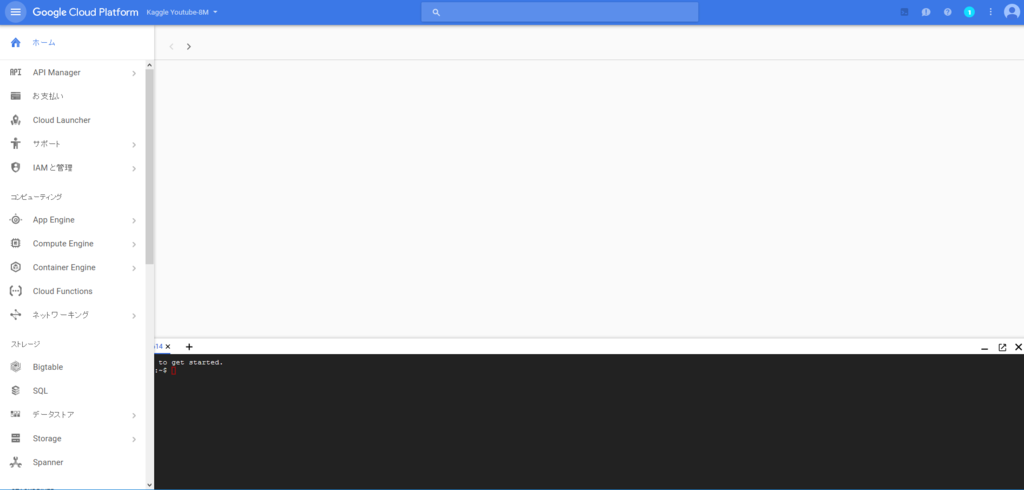
Youtube-8M Challengeで大規模データ解析をするためにGCEのインスタンスを作成します。
GPUを使いたいですが、一旦CPUでかつサンプル回せそうな「n1-standard-4」に決定。
Google Compute Engine の料金 | Compute Engine ドキュメント | Google Cloud Platform
その他もろもろ以下の通り。
マシンタイプ:vCPU x4(n1-standard-4)
OS: Ubuntu 16.10
ディスク:45GB
あとは全部推奨

インスタンスの作成ボタンを押してから実に19秒でインスタンス完成。
AWSよりもかなり早い。
どうやってSSH接続するのか一瞬悩んだが、画面の「SSH」というボタンからコマンドを作成⇒クリックでコマンド発行という流れでトントン拍子に進んでいき、無事接続完了。
kapipara18@kaggle1:~$ df .
Filesystem     1K-blocks    Used Available Use% Mounted on
/dev/sda1       45551936 1198252  44337300   3% /
kapipara18@kaggle1:~$ df .
Filesystem     1K-blocks    Used Available Use% Mounted on
/dev/sda1       45551936 1198252  44337300   3% /
kapipara18@kaggle1:~$ df .
Filesystem     1K-blocks    Used Available Use% Mounted on
/dev/sda1       45551936 1198252  44337300   3% /
kapipara18@kaggle1:~$ df .
Filesystem     1K-blocks    Used Available Use% Mounted on
/dev/sda1       45551936 1198252  44337300   3% /
kapipara18@kaggle1:~$ df .
Filesystem     1K-blocks    Used Available Use% Mounted on
/dev/sda1       45551936 1198252  44337300   3% /
df.
Filesystem 1K-blocks Used Available Use% Mounted on
/dev/sda1 45551936 1198252 44337300 3% /
うむ。ちゃんと45GBある。
明日このインスタンス上でYoutube-8MのDLとサンプルの実行、認識結果CSVのULを行う。。。
なかなかランキングインまでかかるな。
Kaggle -Google Cloud & YouTube-8M Video Understanding Challenge- まずは登録②
kapiparaです。
前回の続きです。
4. Connect to and Run the Starter Code
- We have created starter code in github that you can run in Cloud ML as a starting point to learn how to train, evaluate, and create predictions.
- Cloud MLを動かして学習・評価・予想ができるスターターコードをgithubに置いといた。
- In your cloud shell, type the following into the command line to clone the YouTube-8M github repo:
- githubからクローンするためにとりあえず下のコマンドを打ってみよう。
git clone https://github.com/google/youtube-8m.git
- Go to the github repo README and follow the starter code instructions hereafter until you have completed the training, evaluation & inference steps. Each command line creates a job in Cloud ML, and its progress can be followed in the cloud shell console to give you a sense for how the model is converging. Then return back to this tutorial to generate a predictions file for submission, explained in Step 6 below.
- githubのREADMEを読んで勉強して帰ってきたらStep6よりあとやってSubmission用の予想ファイルを作成しよう。
- We also provide some helpful tips below, to refer to as you are running through the starter code.
- スターターコードを走らせる時用のtipsもあるから見てね。
READMEの内容
①tensorflow 1.0.0以上かつpython2.7以上が必要
②コマンド叩いてディレクトリを作成して小さいサイズ(ビデオレベル)のYoutube-8M deta setをとりあえずDL(mirror=Asiaにするのを忘れずに。)
ついでにvalidate,testもDL。
③コマンドを叩いて学習を実施。
④デフォルト設定だと--train_dirにcheckpointを出力してしまうので、トライ&エラーをしているフェーズにおいては、--start_new_modelの引数渡してcheckpointを無視する設定にするの推奨。
⑤モデルの評価を実行。
⑥Tensorboardを確認。
⑦いい感じだったらinferenceコマンドを実行してpredictions.csvを作成。
5. Download your Predictions File to make a Kaggle Submission
上でStep6って書いてあるけど思いっきり5のこと。すったもんだの末の誤植か。。
- Running the inference command in the Starter Code (Step 5 above) generates a predictions file (predictions.csv). A gs:// link should be given to you when your inference job is finished. You can find this at the end of the log for your inference job by following the instructions under Job Logs, below. View the log to find the gs:// link by clicking on "View Logs" for the job.
- inferenceコマンドを叩けばpredictions.csvがどっかにできるので、ジョブログを確認しよう。ジョブログからgs:// link見つけてgsutilでダウンロードしよう。
- Download your predictions.csv file to your local computer.
- Option 1: You can download it via gsutil:
gsutil cp gs://{your bucket}/{your model}/predictions.csv . - Option 2: You can also download via the Google Cloud Console. Minimize Cloud Shell & navigate to the Console's upper-left drop down menu, go to "Storage" (about midway down the menu). Select the bucket and navigate to the folder where you have saved the predictions.csv file in the steps above.
- Google Cloud Consoleを使ってダウンロードする方法もあるよ。
まで読んだが、ファイルのDLが思いのほか長いのでevaluationから今度実行する。
以上。
Kaggle -Google Cloud & YouTube-8M Video Understanding Challenge- まずは登録①
kapiparaです。
FXもやりたいのですが面白いものを見つけてしまったので本日はKaggleについて。
みなさんご存じのKaggleです。
ごくたまに覗いているのですが、今日久ぶりに覗いてみるた際に面白いコンペを見つけました。
Google Cloud & YouTube-8M Video Understanding Challenge | Kaggle
・賞金3万ドル(総額は10万ドル)
・動画認識のコンペ
・主催者はもちろんGoogle
というコンペです。
Google Cloudも使ってみたいと思っていたのでいろいろちょうどよい。
ということで今日はエントリーしてランキングインするところまで超特急でやりたいと思います。
①アカウント登録
適当に登録します。特筆すべきことなし。
②Google Cloud MLの準備
以下 step-by-step tutorialの解説
https://www.kaggle.com/c/youtube8m#getting-started-with-google-cloud
1. Set up your Google Cloud project
- Create a new Cloud Platform project. This is where your project lives. Click Create Project and follow instructions.
- リンク踏んで口座開く。
- Enable billing for your project. This links a billing method to your project. For a new account, you will already have $300 in trial credits within your default billing account.
- リンクを踏んで請求先設定する。
- Enable the APIs but ignore adding Credentials. This enables the set of Cloud APIs that are needed for Cloud ML functionality such as Cloud Logging to get your training logs. Other APIs include: Cloud Machine Learning, Dataflow, Compute Engine, Cloud Storage, Cloud Storage JSON, and BigQuery APIs.
- リンク踏んでAPI利用設定する。
2. Set up your environment using cloud shell
- There are three paths to use Google Cloud for this competition: Cloud shell, local (Mac/Linux), & Docker. To start we recommend the cloud shell to avoid having to set up a local environment.
- コンペに参加するにはCloud shellかローカルかドッカーの三つの選択肢があるけど構築の手間が省けるしCloud shellがおすすめ。
- Before you click the cloud shell button, make sure that you have already selected your newly-created project (in the screenshot example, the project name is Youtube-Kaggle and shown circled on the left)
- Cloud shellボタンを押す前にSSの左側の〇に囲んだボタン押して新しいプロジェクト作成してね。
- You can start a cloud shell by clicking on the cloud shell icon shown in the screenshot below.
- そしたらSSみたいにCloud shellボタンが画面にでるからね。
ここまで読んでGoogle Cloudの無料トライアルに登録。
だいたい3分ぐらい。
AmazonやMicrosoftみたいに無料期間が終了するとともに自動的に課金されるということはないという良心的な設定。コンペに参加するには課金設定しないといけないが..
さっそくCloud shellを起動

こんなに簡単につながるとは...
セキュリティどうなってるんだ?
いまどういうハード構成のマシンを触っているんだ?
違い過ぎて謎が深まるばかり...
まずはランキングに参加しなければ。
- You should run all of the following commands inside of the cloud shell command line.
- とりあえずshellで↓のコマンドを打とう。
- The first step to setting up the environment is to configure the gcloud command-line tool to use your selected project, where [selected-project-id] is your project id, without the enclosing brackets. For more information on the pre-installed packages in Cloud ML, refer to this thread.
- とりあえず自分のプロジェクトでGCのコマンドラインツールの設定をしよう。もろもろ知りたければリンクを見てね。
gcloud config set project [selected-project-id]
- Install the latest version of TensorFlow (1.0, RC2) with the following 2 command lines.
- とりあえず最新のTFを入れるために↓のコマンドを打とう。
pip download tensorflow
pip install --user -U tensorflow*.whl
なんか叩いてみたけどもとから入ってたっぽい。(バージョン1.0.1)
3. Verify the Google Cloud SDK Components
- List the models to verify that the command returns an empty list.
- リストが空なのを確認しよう。
gcloud ml-engine models list
- The command will an empty list, and after you start creating models, you can see them listed by using this command.
Listed 0 items.
まーそのうちモデル作ったらこのコマンドでモデルのリストが見れるからさ。
コマンドをたたき、「Listed 0 Items.」が表示された。
あまりにも長いのでいったん以上。
FX自動売買 -売買シグナルの洗練とストップロスの調整-
kapiparaです。
本日からFXの自動売買について記載します。
いままでの経歴はいつか詳細に記載しようと思いますが、いままでに10万円を1か月で300万円にするプログラム(EA)を作成したことがあります。
次なるEAを開発すべく現在鋭意開発中です。
現在開発しているEAの概要は以下の通り。
----------------------------------------------------------------------
【売買シグナル】
移動平均(5)と移動平均(20)と移動平均(40)が足の短い順かその逆順になったときに買、売を行う。
【ロスカット条件】
移動平均(20)を常にストップロスに指定。
【プロフィット条件】
なし
【バックテスト条件】
USDJPY5分
スプレッド6
tickstoryで生成
2017/1/1~2017/4/1の4か月
初期資金150000JPY
----------------------------------------------------------------------
結果↓

....
ハイ。全然だめです。
一瞬上がっていますが結局最後は0に漸近しています。
考察は簡単です。
①いいところ:赤線の間ばっちり利益がでています。

②悪いところ:中期と現在値が近い場所はひたすらスプレッド分とられます。

改善策としてはシンプルに中期と現在値が近い場合は取引しない(中期と現在値の乖離を条件に追加する)か、クローズの条件を中期線とのクロス以外に変更するという手があります。
次回は上記2点を試してみようと思います。
以上
ゼロから作るDeep Learning ~Pythonで学ぶディープラーニングの理論と実装~ 3章までの感想
良書と噂される(帯曰く5万冊売れている)「ゼロから作るDeep Learning」を読み始めた。
読了してから感想を書こうかと思ったが、濃厚な内容から最初の方を忘れてしまいそうなので、数回に分けて感想を書こうと思う。
お決まり(amazonリンク)
読んだ本は↓の本です。

ゼロから作るDeep Learning ―Pythonで学ぶディープラーニングの理論と実装
- 作者: 斎藤康毅
- 出版社/メーカー: オライリージャパン
- 発売日: 2016/09/24
- メディア: 単行本(ソフトカバー)
- この商品を含むブログ (10件) を見る
なぜ本書を読もうと思ったか
・Tensorflowを使って為替予測を行ったが、学習データ100%、テストデータ50%というお手本通りの過学習を起こしたたが、過学習が起こる仕組みと論理的な回避策(WEBに転がっているソースをコピペするのではなく勝つべくして勝てる理論)を考えられるようになるため。
・さらにブレイクダウンすると、誤差逆伝搬の計算方法とロジックを理解したいため。
・別の切り口として、初期値と学習率の論理的な決定方法を知るため。
・さらに、tensorflowをブラックボックスとして利用するには限界がきそうなので、Deep Learningを自分で実装できるようになるため。
目的は達成されたか?されそうか?
・章立てとして、目的を達成しうる目次があるため、今後に期待。現在3章まで読了したが、今のところ「目から鱗が落ちる」レベルの内容ではないし、目的も達成できていない。
(確かに非常にわかりやすく記載されていて、読みやすい)
・パーセプトロンとディープラーニングの違いは活性化関数だけ(前者はステップ関数で後者はシグモイド)という言葉はしっくりこず(自分のレベルが低いだけか?..)
・重みとは、即ちインプットデータの認識に対する重要度である(みたいな)記載にはなぜか「おっ」と思った。学習後のパラメータでどこの重みが大きいとか見たことなかったが、重みの値が大きいものだけを残してその重みをコピーして再度学習したりして、重要な重みを細分化すると認識精度が上がったりするのだろうか..
読みやすいですし、著者のDeep Learningへの愛がにじみ出ていて面白い本なので、引き続き読み進めようと思います。
以上