Kaggle -Google Cloud & YouTube-8M Video Understanding Challenge- まずは登録①
kapiparaです。
FXもやりたいのですが面白いものを見つけてしまったので本日はKaggleについて。
みなさんご存じのKaggleです。
ごくたまに覗いているのですが、今日久ぶりに覗いてみるた際に面白いコンペを見つけました。
Google Cloud & YouTube-8M Video Understanding Challenge | Kaggle
・賞金3万ドル(総額は10万ドル)
・動画認識のコンペ
・主催者はもちろんGoogle
というコンペです。
Google Cloudも使ってみたいと思っていたのでいろいろちょうどよい。
ということで今日はエントリーしてランキングインするところまで超特急でやりたいと思います。
①アカウント登録
適当に登録します。特筆すべきことなし。
②Google Cloud MLの準備
以下 step-by-step tutorialの解説
https://www.kaggle.com/c/youtube8m#getting-started-with-google-cloud
1. Set up your Google Cloud project
- Create a new Cloud Platform project. This is where your project lives. Click Create Project and follow instructions.
- リンク踏んで口座開く。
- Enable billing for your project. This links a billing method to your project. For a new account, you will already have $300 in trial credits within your default billing account.
- リンクを踏んで請求先設定する。
- Enable the APIs but ignore adding Credentials. This enables the set of Cloud APIs that are needed for Cloud ML functionality such as Cloud Logging to get your training logs. Other APIs include: Cloud Machine Learning, Dataflow, Compute Engine, Cloud Storage, Cloud Storage JSON, and BigQuery APIs.
- リンク踏んでAPI利用設定する。
2. Set up your environment using cloud shell
- There are three paths to use Google Cloud for this competition: Cloud shell, local (Mac/Linux), & Docker. To start we recommend the cloud shell to avoid having to set up a local environment.
- コンペに参加するにはCloud shellかローカルかドッカーの三つの選択肢があるけど構築の手間が省けるしCloud shellがおすすめ。
- Before you click the cloud shell button, make sure that you have already selected your newly-created project (in the screenshot example, the project name is Youtube-Kaggle and shown circled on the left)
- Cloud shellボタンを押す前にSSの左側の〇に囲んだボタン押して新しいプロジェクト作成してね。
- You can start a cloud shell by clicking on the cloud shell icon shown in the screenshot below.
- そしたらSSみたいにCloud shellボタンが画面にでるからね。
ここまで読んでGoogle Cloudの無料トライアルに登録。
だいたい3分ぐらい。
AmazonやMicrosoftみたいに無料期間が終了するとともに自動的に課金されるということはないという良心的な設定。コンペに参加するには課金設定しないといけないが..
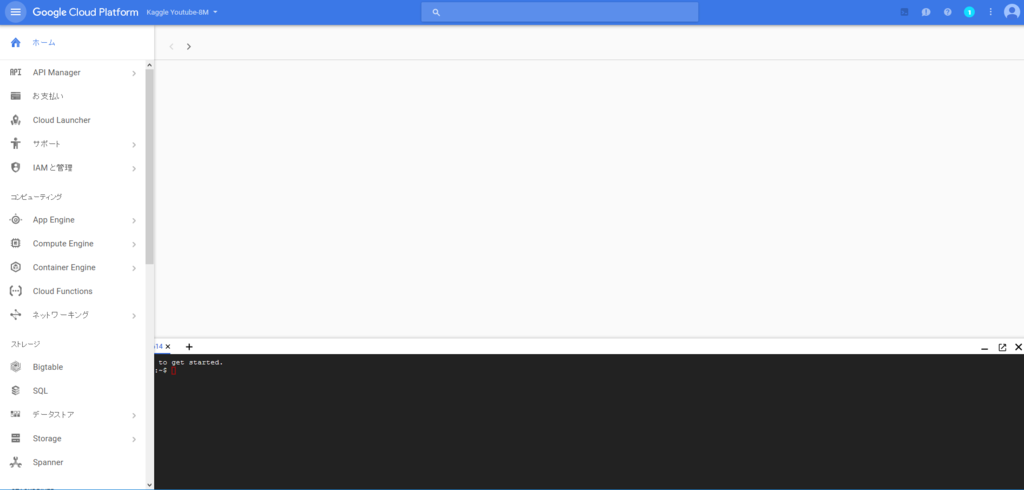
さっそくCloud shellを起動

こんなに簡単につながるとは...
セキュリティどうなってるんだ?
いまどういうハード構成のマシンを触っているんだ?
違い過ぎて謎が深まるばかり...
まずはランキングに参加しなければ。
- You should run all of the following commands inside of the cloud shell command line.
- とりあえずshellで↓のコマンドを打とう。
- The first step to setting up the environment is to configure the gcloud command-line tool to use your selected project, where [selected-project-id] is your project id, without the enclosing brackets. For more information on the pre-installed packages in Cloud ML, refer to this thread.
- とりあえず自分のプロジェクトでGCのコマンドラインツールの設定をしよう。もろもろ知りたければリンクを見てね。
gcloud config set project [selected-project-id]
- Install the latest version of TensorFlow (1.0, RC2) with the following 2 command lines.
- とりあえず最新のTFを入れるために↓のコマンドを打とう。
pip download tensorflow
pip install --user -U tensorflow*.whl
なんか叩いてみたけどもとから入ってたっぽい。(バージョン1.0.1)
3. Verify the Google Cloud SDK Components
- List the models to verify that the command returns an empty list.
- リストが空なのを確認しよう。
gcloud ml-engine models list
- The command will an empty list, and after you start creating models, you can see them listed by using this command.
Listed 0 items.
まーそのうちモデル作ったらこのコマンドでモデルのリストが見れるからさ。
コマンドをたたき、「Listed 0 Items.」が表示された。
あまりにも長いのでいったん以上。